Wednesday, September 9, 2009

Tanabata G.I.T.S.

The most recent "Great International Temari Swap" had as its theme the Tanabata festival. You can read about it here. The suggested designs were stars, but there are also many other features, a river, a goddess, a shepherd, magpies, and wishes for improved handwork skills tied to bamboo plants.

I found this pattern on Debi's TemariMath website and though it would fit the theme really well. The shape fit the star theme, and the colors reflected the night sky and the river that separated the married lovers.

100_1481

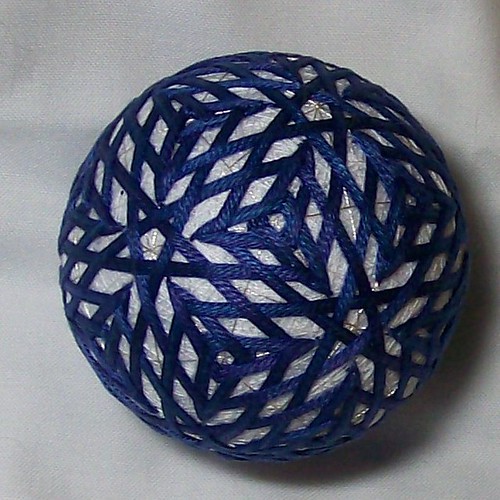
You cannot tell by looking at the finished product, but this temari is 20 triangles and 20 tri-wing patterns. I really love the patterns where you weave in and out, so this was very enjoyable to stitch. On the first outline of each triangle you had to concentrate very hard and get the "overs and unders" right, then the next three strands you could coast. Then it would be time for another first outline and more concentrating. The rhythm really fit my way of stitching.

I used almost a full skein of the two colors I used, a dark blue solid and a DMC color variation. Since the colors were so close I wasn't sure if they would show up, but when I made a mistake I could tell right away. The colors are not showing up very well on this picture, but there is violet, blue, and purple. The variegation really adds depth to the design.

This is the temari I finished last week and could not show; but now Karen got it. She likes it!

Wrapped Temari

This was a very quick temari to make, since there are so few stitches in it. There are no marking threads (I used pins) and the only places there are stitches are where the threads begin and end. I really like the color combination; the blues look particularly rich. There are three shades of blue (and three shades of tan/gold) but the colors are so close it looks like the colors shade because of the curve of the ball. I like the stair-step effect as well, that develops from wrapping 4 strands before changing to another color. The pattern develops from starting along the outside edge and working in toward the middle. One of the books I bought 2 weeks ago (in Japanese) had a very nice picture tutorial of this temari and gave me the confidence to go ahead with it. Of course, now I cannot remember which one of the books it was, but it was one of the beginner books.

100_1487

This was stitched with Vineyard silk, which was wonderful to work with, pure pleasure. One of the colors felt different from the others. The twist was looser and felt a little coarse, but you cannot see the difference. I had to cut out about 12 inches in one color and 4 in another because of knot and a flaw. I didn't cut my threads off the skein ahead of time, but worked "attached." That went well with most of the skeins. Only one of them tended to tangle.

I'm going to take the Japanese Temari Association level 1 and level 2 certification this spring (or at least work toward it). I was so excited about some of the intricate temari I saw patterns for that I sort of skipped over some of the basic stitching, and I'm having to go back and practice that. I know, though, that having a good foundation will help my intricate stitching as well.

Tuesday, September 8, 2009

Wrapping and Weaving

I finished this one last night; I stayed up to finish it so I could show you today. I really like how it turned out, and it was a very new pattern for me.

100_1483

I was shocked by how much thread this one took. I had to make a thread run before I could finish it. It is a s6 division, and the thread is wrapped around the ball at the equator. You control the threads with "keeper pins" while you are wrapping and then stitch around the whole bundle at the end. I hadn't done that before, and I was skeptical, but it worked well. There are a lot of patterns that use that method, now I have my feet wet I will be trying more of them.

There are 3 directions of threads in the woven parts. You dive under the hexagon at the pole to keep the center clear. I was very grateful to Terry for a visual lesson (on TemeriKai.com) on how to keep the weaving organized. Using her method made the weaving almost the easiest part of this temari. The pattern called for 3 threads in each round, but since I was using a smaller mari, I only did 2. The weaving is the same as you see on cane chair seats; that pattern has intrigued me since I was young, and I'm glad I took this chance to work it. One of the next temari I'm looking at also has that type of weaving, so you should see it again.

100_1482

The kiku at the poles has six points, the 6 kiku at the equator each have 8 points. The ones at the poles are outlined in a darker red and the way I outlined them make a very interesting star shape in the center, a very happy accident. The equator kiku have a touch of green at the center for a little bit of interest.

I think the overall effect is good. I didn't follow the pattern exactly. That is one of the reasons I think making temari is "my thing." I seldom change patterns or colors in my other needlework; in making temari I think I only followed the pattern exactly once or twice, in the early days. (Maybe a few more times than that! LOL) The ideas just flow.